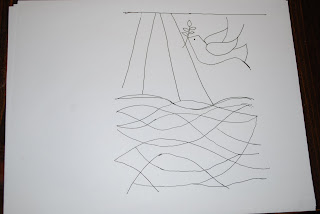
A few weeks ago, my niece was baptized shortly after her eighth birthday. I like to make something special to commemorate the occasion, and I stumbled upon the perfect idea a few days before the baptism. I found this tutorial for making stained glass windows out of glue and acrylic paint.
Unfortunately, I was out of clear glue (read: I didn't even know they made it). So I mixed some watercolor paint with watered down white glue. That being said, I'm going to tell you how you should do it, because it will turn out better.
Step 1: Before you get started, prepare your materials. You will need:
glass and frame (aka cheap photo frame)
white craft glue (elmer's type glue works great)
clear glue (again elmer's clear glue)
acrylic paints in desired colors. You need black.
White paper and pen/pencil.
Craft knife (you only need this if you're sloppy. I needed it)
Small paintbrush
Step 2: mix black acrylic paint in with your white elmer's glue until it's black. This is the only color you need white glue for. It needs to be in the bottle because you will want a fine tip for the black glue.
Step 3: Mix other desired colors in a muffin tin or on disposable plates.
Step 4: Clean your glass. You need some clear glass and a suitable frame for it. I took a dollar-store frame and removed the back for mine. Perfect.
Step 5: Get out some white paper and pencil. Now, draw the line art for your stained glass. I drew some watery waves, a dove, and some light shining on the water as a representation of baptism. You could do any number of drawings. My 4 year old has requested a mermaid stained glass for her birthday.
Step 6: Now place the glass from the frame over the line art.
Step 7: With the black tinted glue, carefully trace over the lines. If you make a mistake, don't worry. You can use a craft knife to clean up any smudges once the glue is dry. Allow to dry completely, preferably over night.
Step 8: With your tinted clear glue, brush a healthy amount of the tinted colors where desired. I should have taken a picture of this step, but I was having too much fun. If you use the clear glue like I didn't, then your finished colors will be more transparent and shinier. I went out and bought clear glue for the mermaid.
Step 9: Again, allow to dry completely, probably overnight again. Slide the finished product into the frame and glue in place. Hot glue will probably work, I used E6000.
Step 10: Done! You can place a suction cup hanger on the back to hang on a window or just prop it against a window. The type of hanging you do will depend on what kind of frame you choose.
Not bad for a first try, but I'll be trying again.


No comments:
Post a Comment